One of the advantages of a bus system is that there is no direct electrical connection required between switch and load. The load is switched by a power electronics which receives messages by the bus system. An obvious advantage is that the link between switch and load, e.g. which switch switches which lights, can simply be modified using the software. Additionally, switching loads can also be realized depending on conditions, e.g. we can switch depending on the brightness (and the time) or we turn on and off a fan depending on the temperature in the engine room.
You can find examples for systems realizing switching by a Bus are for example at Mastervolt with the Digital DC 10x10A as power electronics and the Digital Input to read in physical switches. Another system with a lot of existing components and interfaces to Masterbus and NMEA2000 is CZone. Now, our assumption was that we can easily realize something similar using our current SignalK project. But then we figured out that it’s a bit more complex – so here is the first step towards switching using SignalK.
Currently, switching electrical loads is not completely specified in SignalK. But there is an discussion about “Digital Switching” which we use as a hint how things might be realized later in the SignalK specification. Further we assume that a switching process is not realized by a simple delta for the switching state but as a put request. At least, the description of PUT Requests and the underlying Request/Response mechanism suggest this. Using a put request, the requester gets a feedback of the request state in contrast to a delta, which is just sent in a “fire and forget” manner.
The “Digital Switching” proposal for SignalK contains four groups for the entities related to switching:
- Inputs: Physical devices for switching
- Loads: Consumers of electrical power
- Fuses
- Switches: Logical states for controlling actions
SignalK as a data model is just a representation of the state of these entities. To execute a switching process, a piece of software is required which does the modifications to the states. Also therefore, currently only few software applications exists in the SignalK environment. But there is a Node-RED plugin for SignalK existing which allows a graphical programming of signal flows and which could be an easily usable core for programming digital switching (a description of available nodes is here). But how do all these pieces fit together? In this part, first we’ll get started receiving a PUT-Request as “Input” in the Node-RED plugin. After we figured out how this is working we’ll create these Request by an Arduino in the next step. Finally, to switch the “Load” the request then again has to be forwarded to an Arduino which probably will be the most elaborate part.
First practical steps
For these first steps i used a temporary installation of a SignalK server on a Debian PC. But everything should also work on the installation on the Raspberry PI. You only have to replace “localhost” by “raspberrypi” in the examples. First we have to install the Node-RED plugin. Therefore we start the SignalK server, open the Dashboard in a web browser (http://localhost:3000), and install “@signalk/signalk-node-red” from the Appstore. After installation, a restart of the SignalK server might be required. Then we can open the Node-RED user interface using the URL: http://localhost:3000/plugins/signalk-node-red/redAdmin. It should look like on the screenshot:

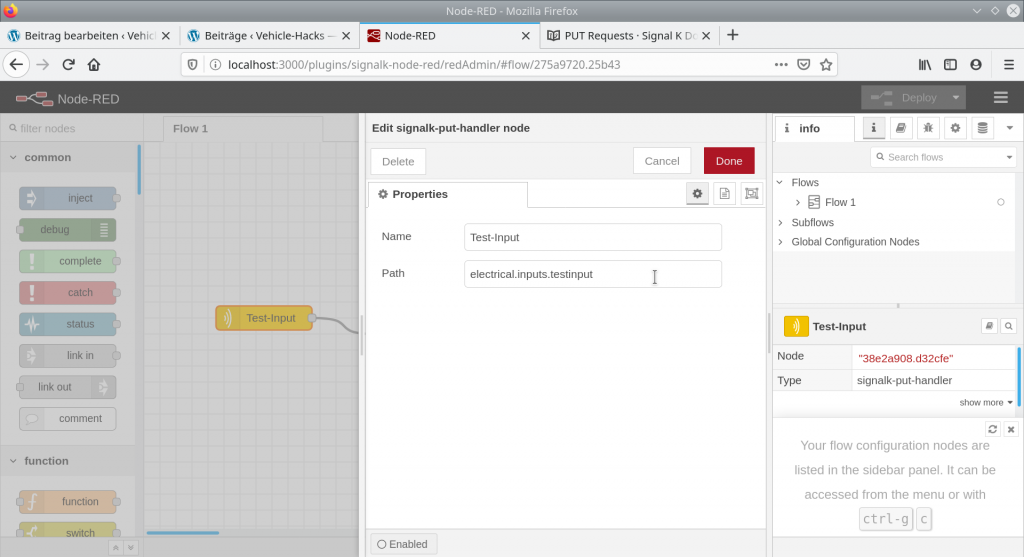
Next, we have to create a PUT-Handler in Node-RED. You’ll find it far down in the list of the nodes in the left part of the window. After dragging it into the flowchart, you can open the properties by double clicking on it. You can give it a name – i’m using “Test Input” here – and you have to enter the path which the PUT-Handler is reacting on. Here we’re using electrical.inputs.testinput. The dialog box then should look like in the screenshot:
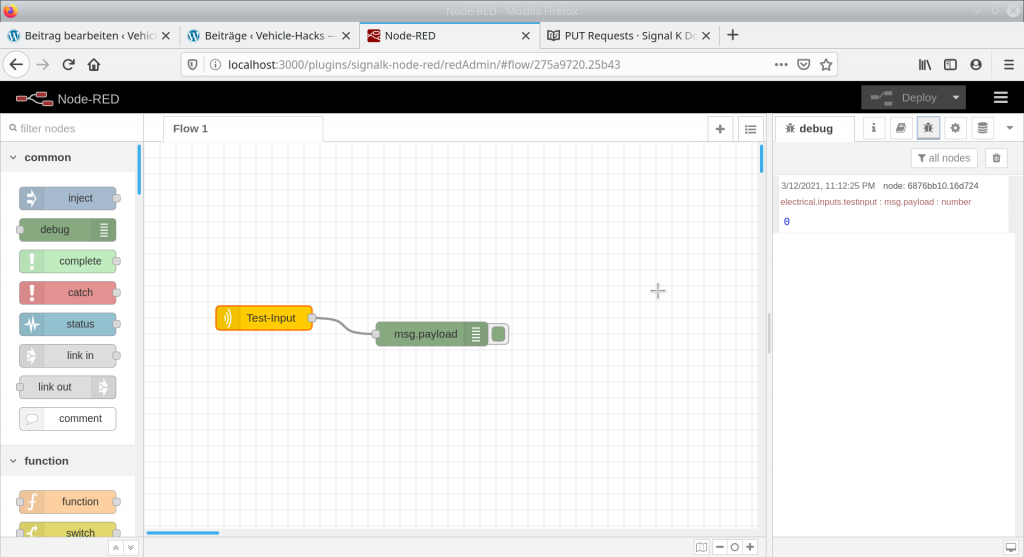
Finally, we can add a debug node which outputs the value of the PUT-Handler to the debug tab, and by clicking and dropping we connect it to the PUT-Handler. Finally we have to click on the red “Deploy” button top right in the window and activate the “debug” tab below, so that we can see the outputs of the debug node.
Now, there are two ways to send a put request to the put handler. The first is using the HTTP REST Interface of the SignalK server. To test it, we’re using the command line utility curl, which we can use to execute HTTP requests. To execute a put request onto the path of the input just created, enter the following command in a terminal:
ralph@debian:~$ curl -X PUT -H "Content-Type: application/json" -d '{"value": 0.0}' http://localhost:3000/signalk/v1/api/vessels/self/electrical/inputs/testinputUsing {“value”: 0.0} you set the value of the input. The server’s answer to the request is a response containing the status. If everything worked out, the status is “COMPLETED” and the statusCode is 200:
{"state":"COMPLETED","requestId":"e8868350-56c8-4f9d-84b5-15e08d8da33a","statusCode":200,"href":"/signalk/v1/requests/e8868350-56c8-4f9d-84b5-15e08d8da33a"}In the right tab in Node-RED you should now see the debug output of the value. Try different values and see how they are transfered to Node-RED as a PUT-Request:
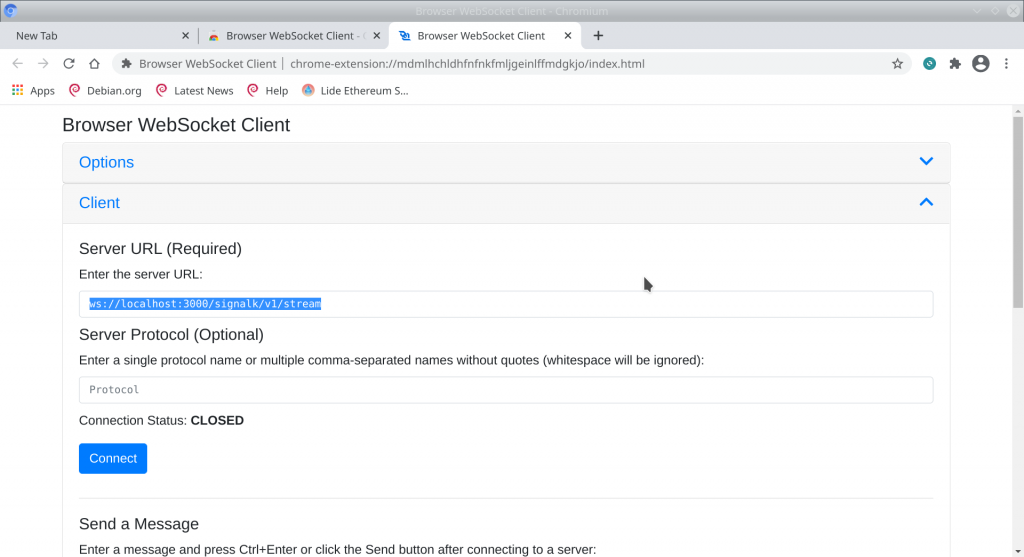
The second option is sending a PUT-Request by websocket. Therefore, you need an application which can open a websocket connection. I used the Chromium webbrowser with the extension “Browser WebSocket Client”. After installing and opening the extension, you have to enter the address of the websocket server. For the SignalK server, the address is
ws://localhost:3000/signalk/v1/streamAfter entering the URL in the field “Enter the server URL:” you can click on the blue “Connect” button to establish the connection:
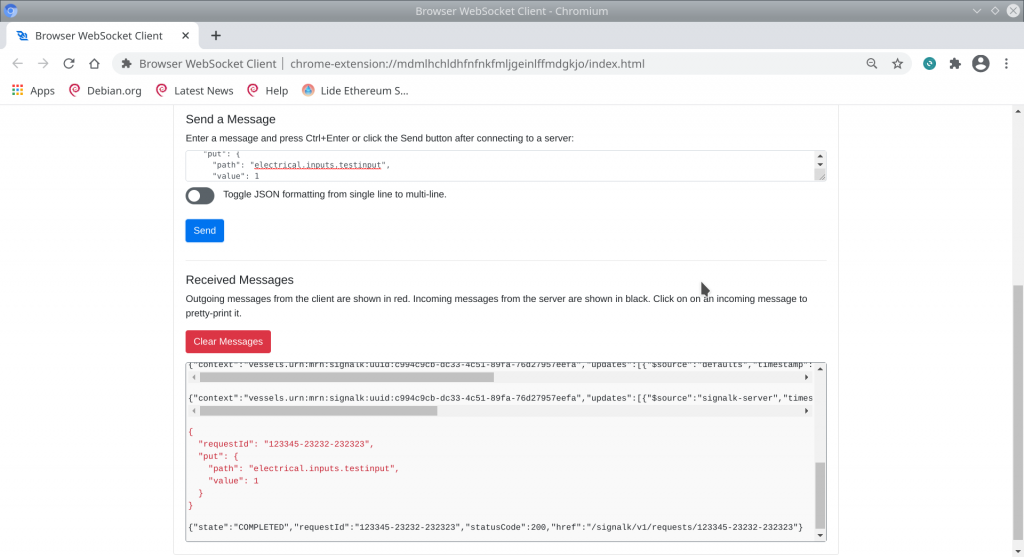
After connecting, further down in “Received Messages” you see some messages from the SignalK server. In “Send Message” we can now send a message to the SignalK server, e.g. a PUT-Request encoded as JSON. Therefore, you enter the following text in the “Message” field:
{
  "requestId": "123345-23232-232323",
  "put": {
    "path": "electrical.inputs.testinput",
    "value": 1
  }
}
If you now click on “Send”, the PUT-Request will be sent to the SignalK server. In “Received Messages” you will see the response from the SignalK server (see the screenshot below). Additionally, in the debug tab of the Node-RED user interface you should see the value “1” of the last PUT-Request.
Results and next steps
Alright, basically it’s now figured out how a PUT-Request can be sent to the SignalK server and processed there. A perfect fit to our last Arduino sketches would have been if we would be able to send a PUT-Request by TCP oder UDP connection, but unfortunatly that’s (currently) not supported. So, first we have to modify the existing Arduino sketch so that we can read in a switch and send the status to the SignalK server by a PUT-Request.