After we figured out how to send a “PUT Request” to the SignalK-Server and how to process it using Node-RED in the first part, this time we’ll create the PUT Request using an Arduino Uno. Therefore, we have to change the communication from using UDP to a web socket. Additionally we have to receive and process the response from the server, so that we can give feedback if the PUT Request was successfully processed by the server.
Hardware and Software in use
- PC with Debian GNU Linux 10.0
- Raspberry PI 3 with Raspbian Buster Lite (02.12.2020) (Configuration is described here)
- Arduino IDE 1.8.13
- Arduino UNO or Arduino MEGA
- Wiznet W5100 Ethernet-Shield
- The ArduinoHttpClient Library Version 0.4.0
- The ArduinoJson Library Version 6.17.2
Details of the sketch
You can find the sketch on our github: https://github.com/Vehicle-Hacks/Arduino-SignalK/releases/tag/v0.3.0, or you clone it using git:
git clone -b v0.2.0 https://github.com/Vehicle-Hacks/Arduino-SignalK.gitLet’s have a short look at the Arduino sketch – most already should be familiar from the page Arduino Uno as SignalK Source. The Sketch has three tasks: It’s reading in a push button and sending the target state to the SignalK server. It’s receiving the response from the Server and extracting the status. And finally, it’s switching an LED to give feedback.
In the upper part of the sketch (Configuration and Includes) the Libraries for Ethernet, ArduinoHttpClient and ArduinoJson are included and required global variable defined. When creating the WebSocketClient, it’s getting the address and port (3000) of the SignalK-Server as parameters. For the push button, additionally to the pin we need two helper variables. The first is to store the desired output state (switchOutput) and the second to debounce the switch. For the LED, because we want to have it blinking while waiting for the response from the server, additionally to the target state we need to know, if it should be blinking and which state it’s in currently.
In the next section (SignalK Messages Sent by Arduino) the JSON for the PUT Request is defined. It’s important to define the same path of the switch here (“electrical.inputs.testinput”) as in the PUT Handler in Node-RED. Here, we defined the same path we used in the first part for testing Node-RED.
After the header the actual code starts. First, we define the function switchStateChanged() which will be called on a state change to send the PUT Request to the SignalK server. The structure is similar like sending over UDP but we have to respect, that the WebSocketClient stores the complete package in the (scarce) RAM of the Arduino before sending, so the size of the JSON is quite limited. But that’s not an issue for the first tests.
Next is the setup() function which inititalizes the network hardware and the WebSocketClient. For the WebSocketClient, we have to set the right URL of the SignalK-Server. Because we don’t want to process any further information except the response to our request, we add the parameter “subscribe=none” to the URL.
In the beginning of the loop() function we check if the WebSocketServer received a message from the server. If yes, we check if it’s a response to our PUT request. If that’s true, we switch the LED according to the requested state. If the message contains a field “name”, we assume that it’s the hello message and print the server name and version. All other messages are ignored.
In the next section, we check the the push button is pressed. Because usually it will be pressed for several cycles for each operation it’s not enough to just toggle the target state each cycle it is but we have to debounce the logic. Therefore, the state is only changed when the push button changes from not operated to operated (raising edge). If we detect an operation, we switch the target state and call the function switchStateChanged() to send a PUT request to the SignalK server.
In the last section we have logic to make the LED blink as long as we’re waiting for a response from the server. Because the response usually is very fast, you won’t see a blinking transition phase. I was only able to create it for testing in case of an error processing the PUT request on the server.
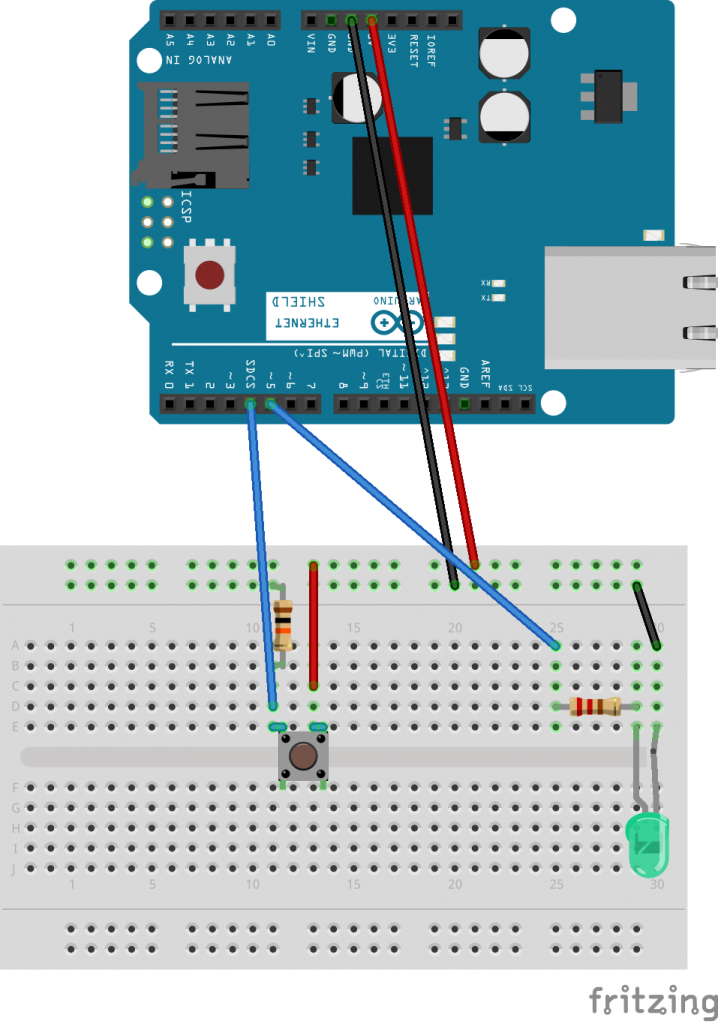
Hardware setup for testing
Even if it’s a simple setup, we’ll show the hardware setup for testing. Pin 4 for the push button will be pulled to ground by a 10 kOhm resistor and to 5V when operated. The LED is connected to pin 5 using a 220 Ohm resistor.
Switching in Node-RED using the Arduino
To execute the test, we have to start the SignalK server with the Node-RED plugin on the Raspberry PI. In Node-RED a PUT-Handler has to be created as described in the last post. If you already followed these post, the Node-RED configuration should be saved and after starting the handler should be there in the Node-RED admin interface. Best is to open the debug tab again, so that you can see the output of the put handler.
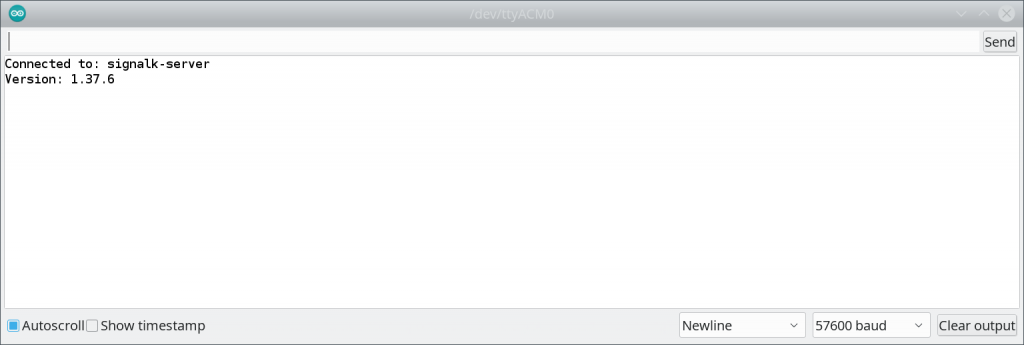
Next, you can upload the sketch to the arduino and open a serial monitor. If everything is fine, you should see the name and the version of the SignalK server in the serial monitor. If you now press the push button, the LED should switch on and off. In the background, there is a PUT request sent to the SignalK server and only after receiving a response with status code 200, the LED will be toggled. You can verify this in the debug tab of the Node-RED admin interface, where you’ll see the PUT requests arriving.
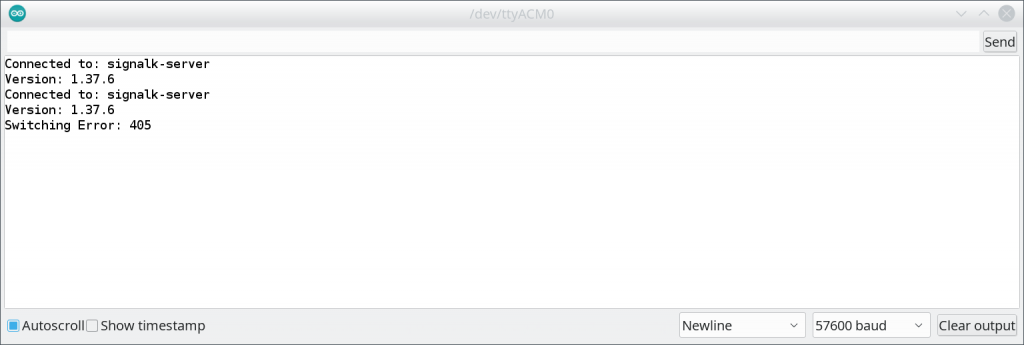
To test an error, you can change the path of the switch in Node-RED or in the Arduino sketch. I changed it in Node-RED to “electrical.inputs.testinput2”. Afterwards, it’s not enough to deploy to Node-RED using the Button but i had to stop and restart the SignalK server on the Raspberry PI. Because then the Arduino is loosing the web socket connection, it also has to be reset. Because now the SignalK server doesn’t find a matching PUT Handler for our request, it’s sending back a status code 405, the LED connected to the Arduino is blinking and we see an error in the serial monitor. After both tests, in my setup it looks like this:
Results and next stept
Using the sketch presented here, it’s possible to read in a switch using the Arduino, send the target state to the SignalK server using a PUT Request, process it in Node-RED and react to the response on the Arduino. Of course, many points are still open: The UUID is not conforming to the standard and is not processed and the sketch is not optimized for the usage of several switches. But the next task – maybe even more challenging – is, to switch a load from the SignalK server. That’s why we’ll let the sketch how it is for now – further optimization can be done once we have the first version of the full setup running.