Did you always have the idea to log some data from your vehicle to hunt an error or just for fun? A modern approach to do that is to connect the vehicle to a cloud as an IoT device. In this post we’ll use a Raspberry PI, a GPS (GNSS) receiver and an ELM327 compatible OBD interface to do this connection. A short overview: The Raspberry PI is using a python script to read data from GPS and OBD and is sending this data JSON-encoded by MQTT to the AWS IoT Core. There it will be written to an AWS Timestream database, from where it can be further processed. One example is to show it using a Grafana dashboard.
Hardware and Software in use
- Raspberry PI 3 with Raspbian Buster Lite 07.05.2021
- USB GPS (GNSS) receiver (Navilock NL-8002U with a uBlox chipset, but should work with any other USB GPS/GNSS receiver)
- OBDLink SX ELM327 compatible OBD interface
- AWS Account (a free one should be sufficient)
- The pynmeagps-Bibliothek version 1.0.4
- The python-OBD-Bibliothek version 0.7.1
Setting up the Raspberry PI
First, we create the SD card for the Raspberry Pi using the common way. If your’re unsure, have a look at the section “Create a SD card using Linux” here. After writing the image and booting the Raspberry PI, first we’ll update raspbian and install pip3 (the python packet manager) and the required python dependencies:
pi@raspberrypi:~ $ sudo apt-get update
pi@raspberrypi:~ $ sudo apt-get upgrade
pi@raspberrypi:~ $ sudo apt-get install python3-pip
pi@raspberrypi:~ $ sudo pip3 install AWSIotPythonSDK obd pynmeagps
After installing the packages, open “raspi-config” as root. There we have to choose the right country for the WiFi-Adapter to be activated. For internet access, here i decided to use the “Personal Hotspot” of my mobile phone. Start the tool with the following command:
pi@raspberrypi:~ $ sudo raspi-configThen open “5 Localization Options -> 4 WLAN Country” and choose the right country. Next, open “1 System Options -> S1 Wireless LAN” and fill the correct SSID and Password of your Personal Hotspot.
Configure AWS
After logging in to AWS, you have to choose the region in which you want to work. If all your services are gone after a login, the reason might be that you’re in the wrong region. Here, i choose Frankfurt (“eu-central-1”) as region:

After selecting the region, open the IoT Core on the top left from “Services – Internet of Things”. When you create a thing you have to assign a policy for the access rights. So we start by adding this policy. Therefore, on the left open “Secure -> Policies” and then “Create” to add a new policy. In the dialog which is popping up, chose the “Advanced Mode” to add the following policy in the text entry:
Be careful – the version shown here is not very restrictive considering right. We’ll test a more restrictive version and add this later.
{
"Version": "2012-10-17",
"Statement": [
{
"Effect": "Allow",
"Action": [
"iot:Publish",
"iot:Receive"
],
"Resource": [
"*"
]
},
{
"Effect": "Allow",
"Action": [
"iot:Subscribe"
],
"Resource": [
"*"
]
},
{
"Effect": "Allow",
"Action": [
"iot:Connect"
],
"Resource": [
"arn:aws:iot:eu-central-1:811602309128:client/test-*"
]
}
]
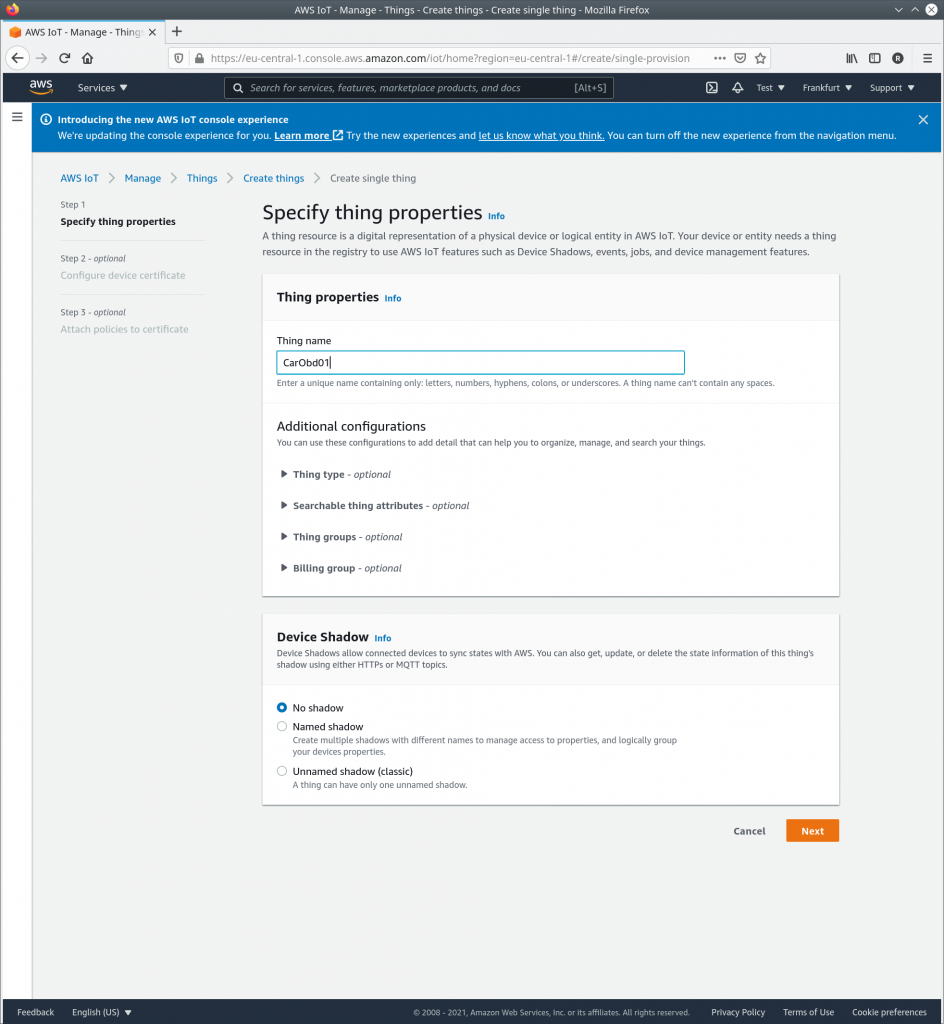
}Next, we create the first “Thing”. By choosing “Manage -> Things” you can open the list of things which is still empty now. By clicking “Create things” you can add your first thing. After clicking “Create”, you choose “Create single thing”. In the next dialog you choose a name for the “Thing”. All the other options can stay on default like in the following screenshot.
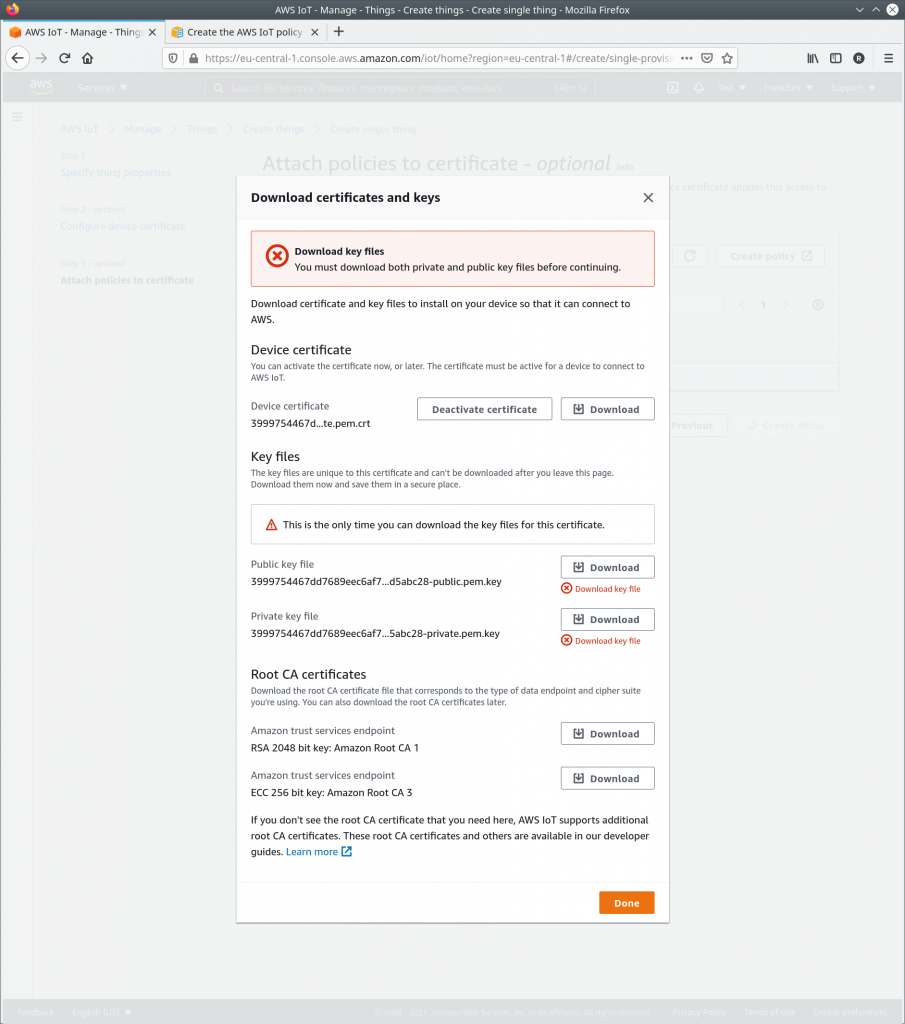
By clicking “Next” you get one dialog further and there you choose “Auto-generate a new certificate”. In the following dialoge you choose the “CarPolicy” created in the beginning and finally you click on “Create Thing”. Now a dialog opens in which you can download the certificates for the “Thing”. You always have to download the “Device certificate”, the “Public key file” and the “Private key file”. The public and private key can only be downloaded now, so don’t forget to do it! The “Root CA” certificates are valid for one endpoint (region), so you only have to download them once and can use them for several things.
We want to store the data sent by the “Thing” in the Amazon Timestream Database. Therefore, we have to create a new database. You could do this from the IoT Core-menu but here we will create it by the Amazon Timestream service. Therefore you choose “Services -> Database -> Amazon Timestream” and in the window opening “Create Database”. Set the type to “Standard database”, then you can give the database a name. In this example i chose “carDB”. By clicking on “Create Database” the database will be created.
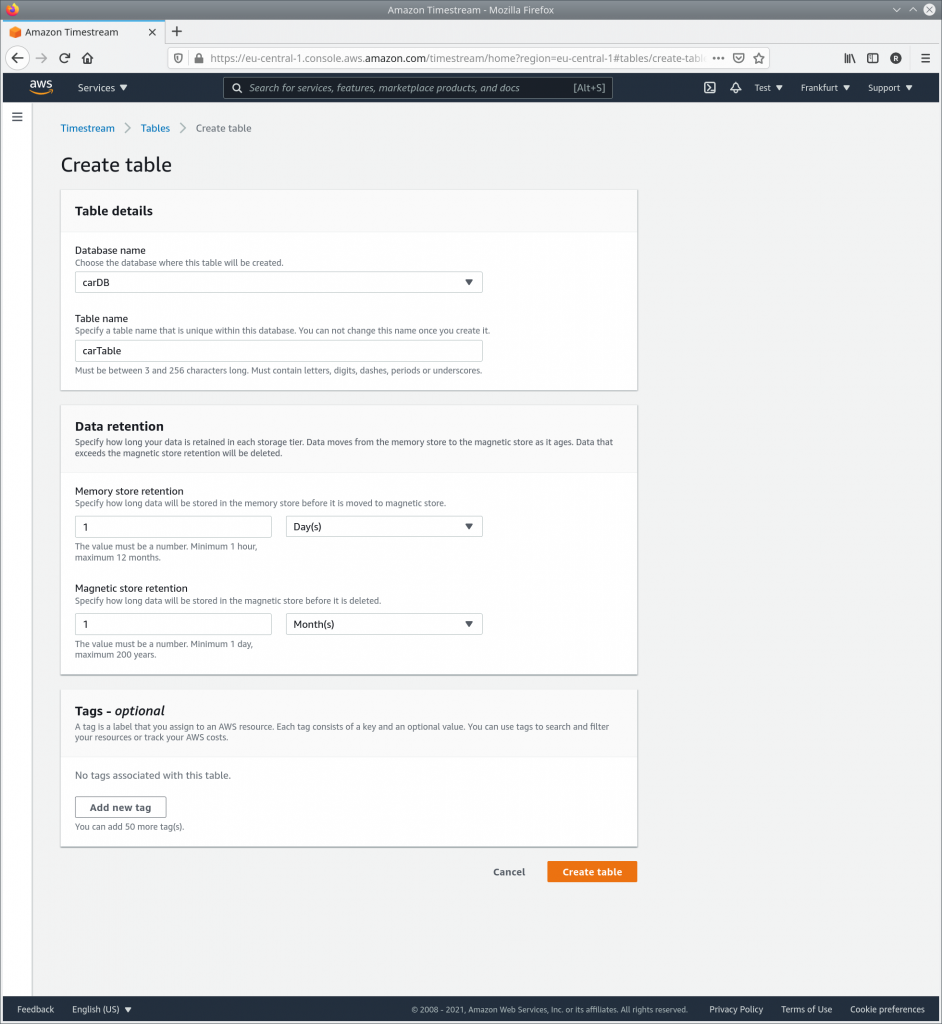
Now the list of databases will open up. If you now choose “Tables” from the menu to the left, an empty list of tables will open up. Here you can choose “Create table” to add a new table. In the dialog opening up you chose the database just created (carDB) and give the table a name (i chose “carTable” in the example). For “Data retention” you can use e.g. one day for “Memory” and one month for “Magnetic Storage”, but you can also choose different values. A screenshot of the dialog with the settings chosen by me is shown in the screenshot below. By clicking on “Create Table” the table will be created.
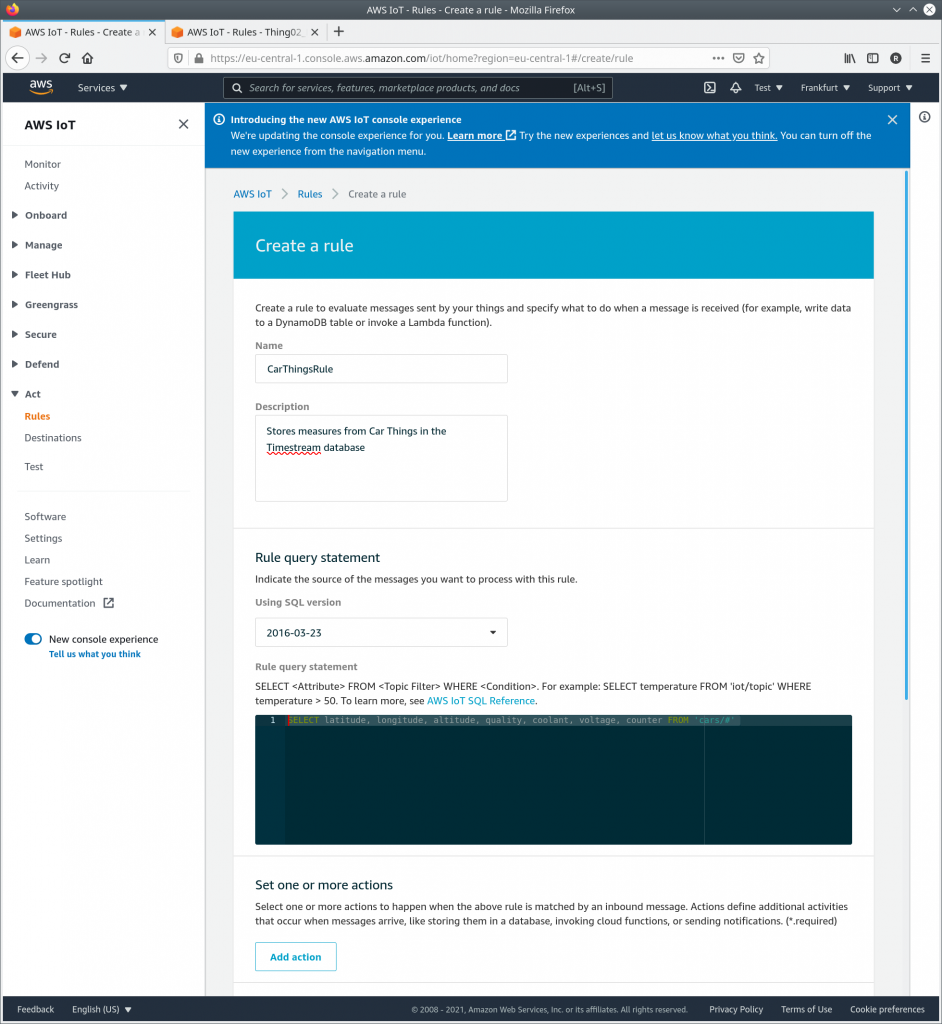
Now you can add a rule which stores selected data sent by the “Thing” in the Amazon Timestream database. Therefore, you again open the IoT Core and at the left side chose “Act->Rules” and from the window opening up “Create Rule”. In the dialog opening now, first you give the new rule a name (here: “CarThingsRule”) and description. The important thing is the “Rule query statement”, by which values are selected from the JSON received by MQTT for further processing. As query statement chose the following text:
SELECT latitude, longitude, altitude, quality, coolant, voltage, oil, load, intake, counter FROM 'cars/#'Now, the dialog should look like this:
Finally, you click on “Add action”, chose “Write a message into a Timestream table” from the list and click on “Configure action”. The dialog opening up now is shown in the screenshot below. There you chose the Database and table just created (“carDB” and carTable”). The “Dimension” help with identification ot the “Things”. Here, we chose “Car_ID” from the JSON-Field “ID” as dimension. Finally, you have to create a role by clicking “Create Role” (which i called “CarRuleRole”) in the dialog. Finally, by chosing “Update” you add the action to the rule.
Back in the previous dialog, you scroll down to the bottom and chose “Create rule” to add the rule to the AWS IoT Core.

Finally, we need the address of the “Device data endpoint” to which the “Things” connect. To get it, in the AWS IoT-Menu on the left you click on “Settings”. On top of the dialog opening you find the address in the format “XXX-ats.iot.eu-central-1.amazonaws.com”:
Now we are ready with the configuration of AWS and can start creating the Pyhton-Script for the Raspberry PI which will upload the data by MQTT.
The python script on the Raspberry PI
The python script which i’ll use in this post is a modified version of the “pubsub.py-sample” from the AWS IoT Device SDK v2 for Python. You’ll find an introduction into the original sampl in the AWS-Documentation. You can download the modified sample from our Github:
pi@raspberrypi:~/tmp$ git clone https://github.com/Vehicle-Hacks/cariot.gitCompared to the original, starting in line 57 a few global variables and two funtions are added. Let’s have a look at the GPS part first: From the GPS Receiver we get a continuous stream of NMEA0183 data by a serial interface. This has to be decoded and the messages we want to forward to IoT Core selected from the stream. The easiest solution is that we open a separate thread which is only doing this job by processing the NME0183 data. The communication between the main thread and the GPS decoder is done using global variables, which we define first:
# GPS Globals
gpsInterface = '/dev/ttyACM0'
gpsSpeed = 115200
gpsRunning = True
gpsAvailable = False
lat = 0;
lon = 0;
alt = 0;
quality = 0;
It’s important to match the to variables “gpsInterface” and “gpsSpeed” to the interface for your GPS receiver. Further below, the function decoding the NMEA0183 stream from the GPS receiver is defined. It is using pynmeaagps to decode the signals and then writes the selected signals to the global variables. From there, the main thread is sending them to AWS IoT Core using MQTT:
def gps_thread():
    global lat, lon, alt, quality, gpsRunning, gpsAvailable
    gpsStream = Serial(gpsInterface, gpsSpeed, timeout=3)
    nms = NMEAReader(gpsStream)
    print('GPS started')
    while gpsRunning:
        try:
            (raw_data, parsed_data) = nms.read()
            if parsed_data:
                if parsed_data.msgID == "GGA":
                    lat = parsed_data.lat
                    lon = parsed_data.lon
                    alt = parsed_data.alt
                    quality = parsed_data.quality
                    gpsAvailable = True
        except (
            nme.NMEAStreamError,
            nme.NMEAMessageError,
            nme.NMEATypeError,
            nme.NMEAParseError,
        ) as err:
            print(f"Something went wrong {err}")
            continue
In the head of the function, the global variables are declared in the functions context. After that, the GPS interface and pynmeags are initialized. Then the thread is running in an infinite loop until gpsRunning is set to “False” by the main thread when the script is stopped. While the thread is running in each iteration one NMEA0183 package is decoded by pynmeagps. If it is a “GGA” packet, latitude, longitude, altitude and quality are read out and given to the main thread by the global variables. Additionally, “gpsAvailable” is set to “True”, so the main thread knows that a valid fix was received and the GPS receiver is fully initialized.
The part for OBD is similar: The interface is automatically detected by the python-OBD library. Therefore, we only nead the variables for controlling the thread and giving the values to the main thread. The thread is initializing the ELM327 OBD interface and then requests some OBD PID’s until it is stopped. Be carfull: The script does not check if the PID’s are supported by the vehicle, so the script can crash with an exception in this place! But you can add, change or remove PID’s as you like, similar to the oil temperature here:
# OBD Globals
obdRunning = True
obdAvailable = False
obdVoltage = 0
obdCoolant = 0
obdOil = 0
obdLoad = 0
obdIntake = 0

# OBD Thread
def obd_thread():
    global obdRunning, obdAvailable, obdVoltage, obdCoolant, obdOil, obdLoad, obdIntake
    obdConnection = obd.OBD()
    print("OBD connected")
    while obdRunning:
        cmd = obd.commands.COOLANT_TEMP
        response = obdConnection.query(cmd)
        obdCoolant = response.value.magnitude

        cmd = obd.commands.ELM_VOLTAGE
        response = obdConnection.query(cmd)
        obdVoltage = response.value.magnitude

        #cmd = obd.commands.OIL_TEMP
        #response = obdConnection.query(cmd)
        #obdOil = response.value

        cmd = obd.commands.ENGINE_LOAD
        response = obdConnection.query(cmd)
        obdLoad = response.value.magnitude

        cmd = obd.commands.INTAKE_TEMP
        response = obdConnection.query(cmd)
        obdIntake = response.value.magnitude
        obdAvailable = True
        time.sleep(0.5)
To start the script, you have to set some parameters:
| –endpoint | The endpoint as we read it from the IoT Core |
| –root-ca | The “AmazonRootCA1.pem” file which you downloaded during creation of the thing |
| –cert | The certificate which you downloaded during creation of the thing (.pem.crt file) |
| –key | The private key file which you downloaded during creation of the thing (-private.pem.key file) |
| –topic | The MQTT topic which the script is publishing |
| –count | The number of messages which will be send, 0 for infinite |
A complete call looks like the following (XXX is the endpoint, YYY the thing):
python3 simple_car_connect.py --endpoint XXX-ats.iot.eu-central-1.amazonaws.com --root-ca AmazonRootCA1.pem --cert YYY-certificate.pem.crt --key YYY-private.pem.key --topic cars/01 --count=0Viewing the Data in AWS
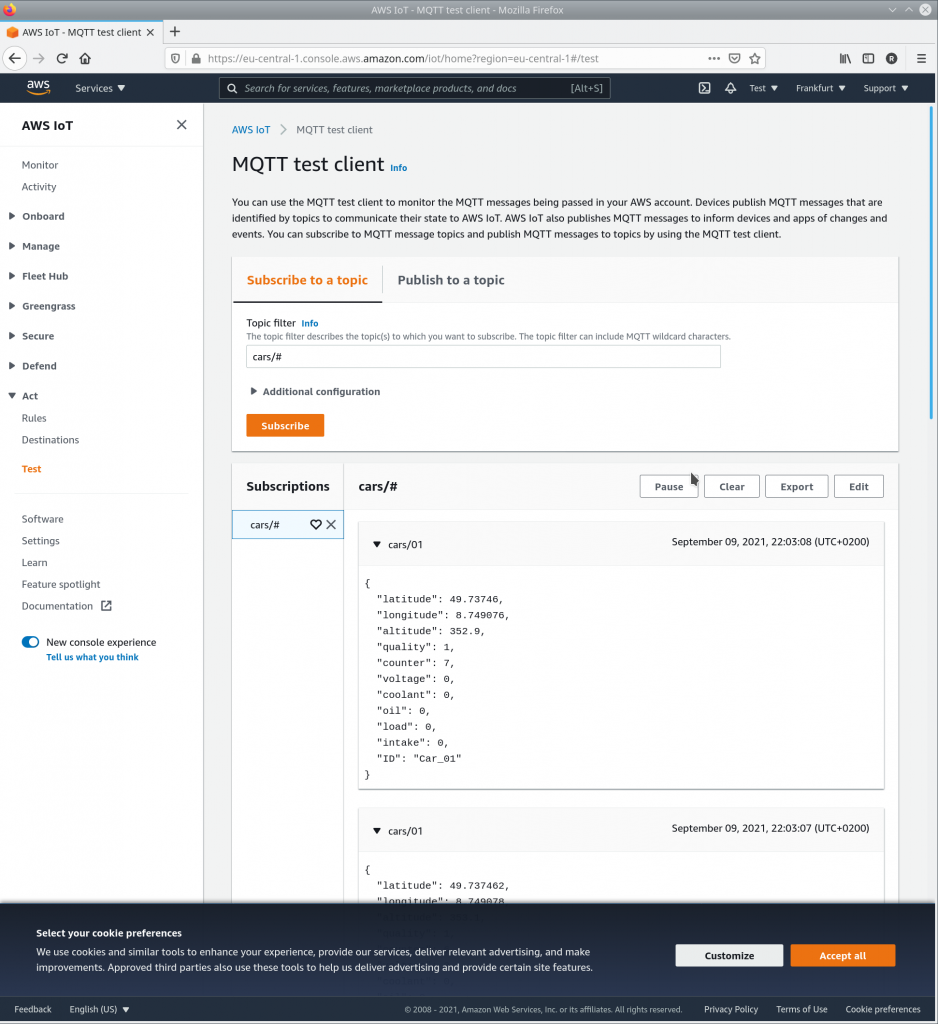
After the script is running now, we can view the data published to AWS IoT Core. A first simple but useful tool is the MQTT test client. You can open it in “Services -> IoT Core -> Test”. In “Topic filter” you have to add a filter for the MQTT topics to subscribe. In our exampls, using “cars/#” with the wildcard character “#” will result in receiving all topics of “cars”-Things. After clicking on “Subscribe”, in the field “Subscriptions” you should see the topic just configured and next to it the messages sent by the Raspberry PI. A little note: When i created the screenshot, i didn’t have access to an OBD port, so all the values read from OBD are set to zero.
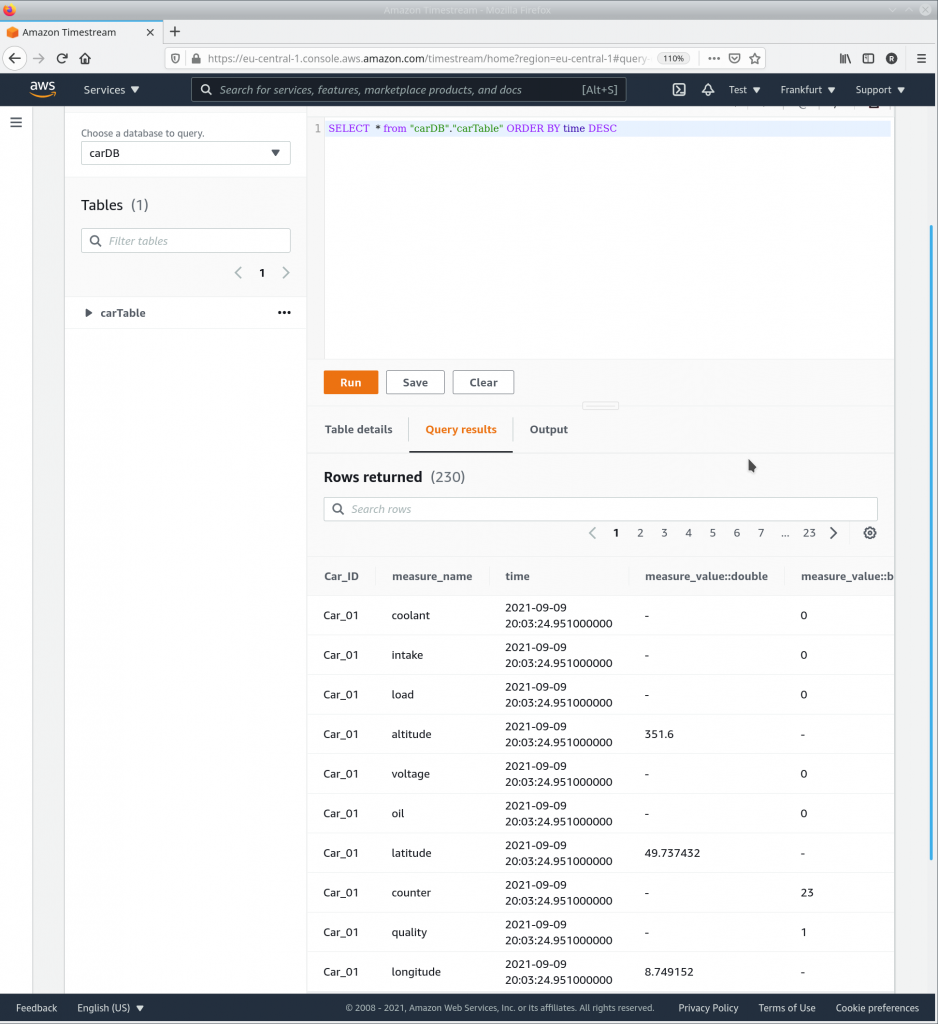
Next, you can try if the data is written to Amazon Timestream. Therefore, you open “Services -> Amazon Timestream” and open the menu by clicking on the three bars left in the window. Then, you open “Tables -> carTable -> Query Table” and enter the following query statement:
SELECT * from "carDB"."carTable" ORDER BY time DESCAfter executing the query you should get a result similar to the following screenshot:
Result and next steps
Now, we are able to send OBD2 and GPS data to the AWS IoT Core using a Raspberry PI and to write it into an Amazon Timestream database. Starting the script by shell commands in the vehicle is not a good solution – but it should be possible to improve this by starting it as a service. And of course, we don’t just want to collect the data but also do some analysis. A simple option would be to create a dashboard using Grafana. We will present more about both topics in the next posts.