On this page we will describe how to connect to a SignalK server using an ESP8266, receive some data and show it on a display. For the interpretation of the SignaK messages we have to decode some strings. The interpretation of the SignalK strings need some more computational ressources, so this time we won’t use an AVR based Arduino but an ESP8266 which has quite some more ressources. But still it’s programmable using the Arduino IDE and we can use the libraries we’re already used to from the AVR, so it is a good fit to our project.
Hardware and Software in use
- A PC with Debian GNU Linux 10.0
- A Raspberry Pi 3 with Raspbian GNU Linux 10.0 as configured here
- Arduino IDE 1.8.3
- A Wemos D1 miniPro V1.0.0 with the OLED 0.66 Shield
- ESP8266 Package for Arduino Version 2.7.4
- ArduinoJson Version 6.16.1
- StreamUtils for Arduino Version 1.5.0
- Adafruit GFX Library Version 1.10.0
- Adafruit BusIO Version 1.4.1
- Adafruit SSD1306 Wemos Mini OLED Version Version 1.1.2
Subscribing Data from a SignalK Server
To get some data from the SignalK Server, there is a subscription protocol defined. . First we will use some command line tools to ensure that we understood the subscription protocol and are able to get some data from the server. After that, we start implementing an Arduino sketch.
First we start a SignalK server using a configuration for playing back data from a NMEA file:
pi@raspberrypi:~/signalk-server-node $ ./bin/nmea-from-fileNow we connect to the SignalK Server using netcat. This time we use TCP for the connection (but UDP should also be possible). After the tool connected to the SignalK server it’s receiving and showing the SignalK Hello Message.
ralph@debian:~$ nc raspberrypi 8375
{"name":"signalk-server","version":"1.37.6","self":"vessels.urn:mrn:signalk:uuid:1cb3f5ae-95c5-4850-98be-f5909ba34b4f","roles":["master","main"],"timestamp":"2021-02-11T19:41:11.555Z"}
Characters typed in the terminal now are sent to the SignalK server. To receive data, we have to subscribe to some paths of the server using a subscription string. As a first simple test, we subscribe to all data. Therefore, in the terminal where you have the “nc” command open you can type the subscription text (or copy it from here using ctrl+c and paste it in the terminal using ctrl-shift-v):
{"context":"*","subscribe":[{"path":"*"}]}After pressing “Return”, the string will be sent and the SignalK server starts sending all available messages to us. The result is a continuous stream of all the SignalK messages provided by the server:
{"context":"vessels.urn:mrn:signalk:uuid:1cb3f5ae-95c5-4850-98be-f5909ba34b4f","updates":[{"$source":"defaults","timestamp":"2021-02-11T19:36:59.456Z","values":[{"path":"","value":{"uuid":"urn:mrn:signalk:uuid:1cb3f5ae-95c5-4850-98be-f5909ba34b4f"}}]}]}
{"context":"vessels.urn:mrn:signalk:uuid:1cb3f5ae-95c5-4850-98be-f5909ba34b4f","updates":[{"source":{"sentence":"VHW","talker":"II","type":"NMEA0183","label":"nmeaFromFile"},"$source":"nmeaFromFile.II","timestamp":"2021-02-11T19:44:12.819Z","values":[{"path":"navigation.speedThroughWater","value":3.2512897125489495}]}]}
{"context":"vessels.urn:mrn:signalk:uuid:1cb3f5ae-95c5-4850-98be-f5909ba34b4f","updates":[{"source":{"sentence":"VPW","talker":"II","type":"NMEA0183","label":"nmeaFromFile"},"$source":"nmeaFromFile.II","timestamp":"2021-02-11T19:44:12.819Z","values":[{"path":"performance.velocityMadeGood","value":0.8642668856142777}]}]}
{"context":"vessels.urn:mrn:signalk:uuid:1cb3f5ae-95c5-4850-98be-f5909ba34b4f","updates":[{"source":{"sentence":"VTG","talker":"II","type":"NMEA0183","label":"nmeaFromFile"},"$source":"nmeaFromFile.II","timestamp":"2021-02-11T19:44:12.918Z","values":[{"path":"navigation.courseOverGroundMagnetic","value":3.6976545541194707}]}]}
{"context":"vessels.urn:mrn:signalk:uuid:1cb3f5ae-95c5-4850-98be-f5909ba34b4f","updates":[{"source":{"sentence":"VTG","talker":"II","type":"NMEA0183","label":"nmeaFromFile"},"$source":"nmeaFromFile.II","timestamp":"2021-02-11T19:44:12.918Z","values":[{"path":"navigation.courseOverGroundTrue","value":3.6976545541194707}]}]}
{"context":"vessels.urn:mrn:signalk:uuid:1cb3f5ae-95c5-4850-98be-f5909ba34b4f","updates":[{"source":{"sentence":"VTG","talker":"II","type":"NMEA0183","label":"nmeaFromFile"},"$source":"nmeaFromFile.II","timestamp":"2021-02-11T19:44:12.918Z","values":[{"path":"navigation.speedOverGround","value":3.1381119060994607}]}]}
{"context":"vessels.urn:mrn:signalk:uuid:1cb3f5ae-95c5-4850-98be-f5909ba34b4f","updates":[{"source":{"sentence":"MWV","talker":"II","type":"NMEA0183","label":"nmeaFromFile"},"$source":"nmeaFromFile.II","timestamp":"2021-02-11T19:44:12.519Z","values":[{"path":"environment.wind.speedApparent","value":4.496245583493326}]}]}
.
.
.
Now, let’s select some specific messages for subscription. To test this, we cancel the running netcat using ctrl-c and reopen it. This time we use a subscription string containing the selected paths instead of the wildcard (*):
ralph@debian:~$ nc raspberrypi 8375
{"name":"signalk-server","version":"1.37.6","self":"vessels.urn:mrn:signalk:uuid:1cb3f5ae-95c5-4850-98be-f5909ba34b4f","roles":["master","main"],"timestamp":"2021-02-11T19:51:31.156Z"}
After receiving the SignalK Hello Message, we enter the following subscription string:
{"context":"vessels.self","subscribe":[{"path":"navigation.speedThroughWater"},{"path":"environment.depth.belowTransducer"}]}Now send the string to the server using return and we should receive the requested paths:
{"context":"vessels.urn:mrn:signalk:uuid:1cb3f5ae-95c5-4850-98be-f5909ba34b4f","updates":[{"source":{"sentence":"VHW","talker":"II","type":"NMEA0183","label":"nmeaFromFile"},"$source":"nmeaFromFile.II","timestamp":"2021-02-11T19:54:32.542Z","values":[{"path":"navigation.speedThroughWater","value":0.7356557419216768}]}]}
{"context":"vessels.urn:mrn:signalk:uuid:1cb3f5ae-95c5-4850-98be-f5909ba34b4f","updates":[{"source":{"sentence":"DBT","talker":"II","type":"NMEA0183","label":"nmeaFromFile"},"$source":"nmeaFromFile.II","timestamp":"2021-02-11T19:54:32.743Z","values":[{"path":"environment.depth.belowTransducer","value":7.65}]}]}
{"context":"vessels.urn:mrn:signalk:uuid:1cb3f5ae-95c5-4850-98be-f5909ba34b4f","updates":[{"source":{"sentence":"VHW","talker":"II","type":"NMEA0183","label":"nmeaFromFile"},"$source":"nmeaFromFile.II","timestamp":"2021-02-11T19:54:32.944Z","values":[{"path":"navigation.speedThroughWater","value":0.7305112961739728}]}]}
{"context":"vessels.urn:mrn:signalk:uuid:1cb3f5ae-95c5-4850-98be-f5909ba34b4f","updates":[{"source":{"sentence":"DBT","talker":"II","type":"NMEA0183","label":"nmeaFromFile"},"$source":"nmeaFromFile.II","timestamp":"2021-02-11T19:54:33.242Z","values":[{"path":"environment.depth.belowTransducer","value":7.67}]}]}
Adding the ESP8266 to the Arduino IDE
The ESP8266 is not contained in the Arduino IDE by default and has to be manuall added to the Arduino IDE. You’ll find the original package and the documentation on the ESP8266 Github. Here is a summary of the steps required to add it for our project.
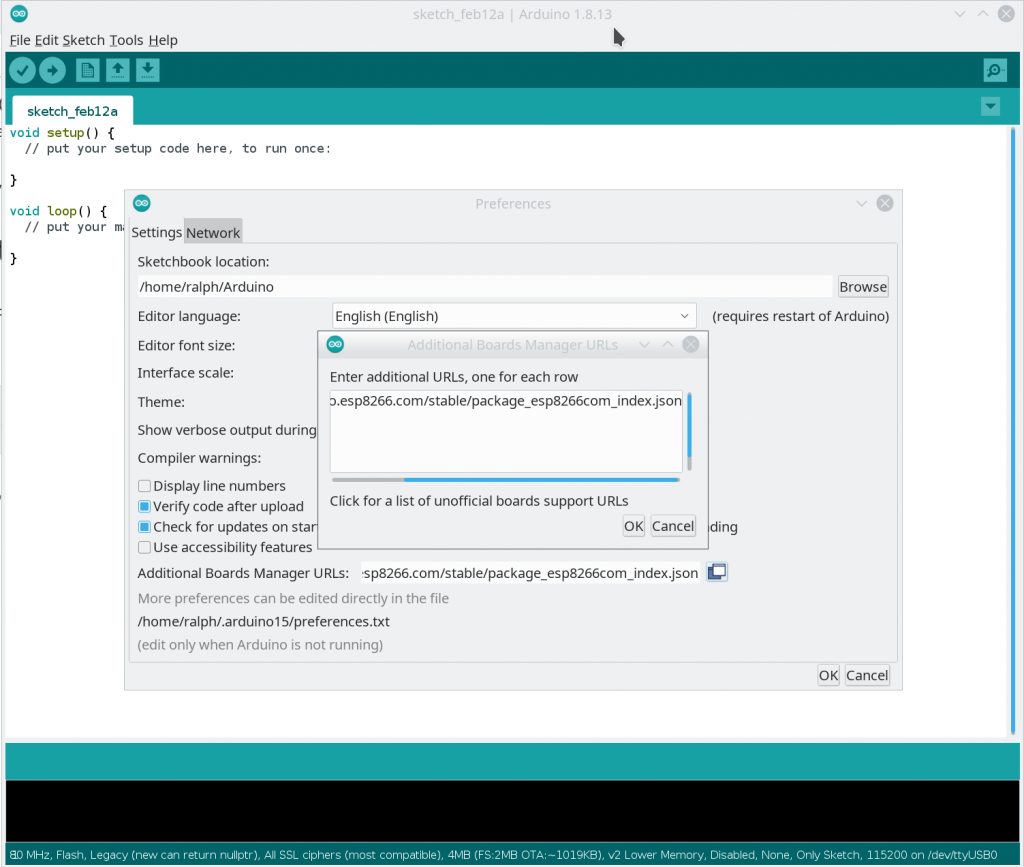
First we open “File->Preferences” and click on the icon behind “Additional Board Manager URLs”. In the Dialog which pops up, we add a line containing the URL: “https://arduino.esp8266.com/stable/package_esp8266com_index.json” (see screenshot below).
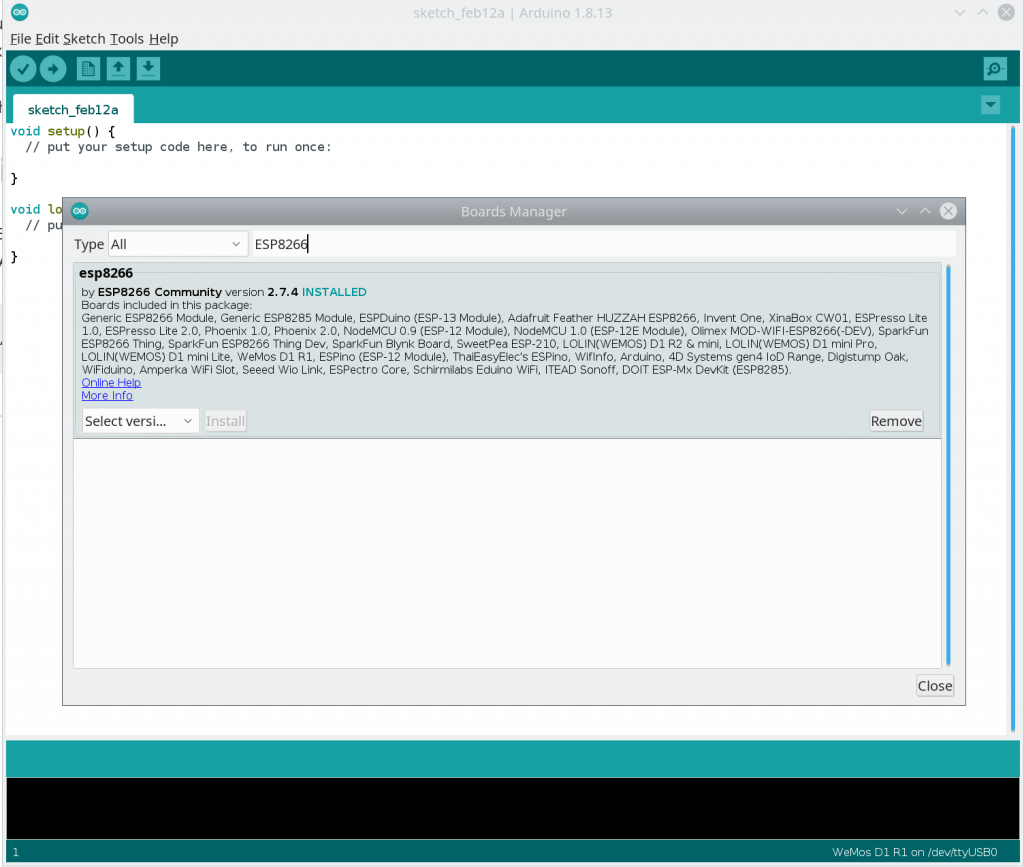
Next we open “Tools->Board: XXX->Boards Manager”, search for the ESP8266 package and install it (see screenshot below). After installation, we can select the WeMos D1 R1 (or your ESP8266 Board) in “Tools->Board: XXXX->ESP8266 2.7.4”. Now the first part of the installation is done and we are ready to compile for the WeMos D1.
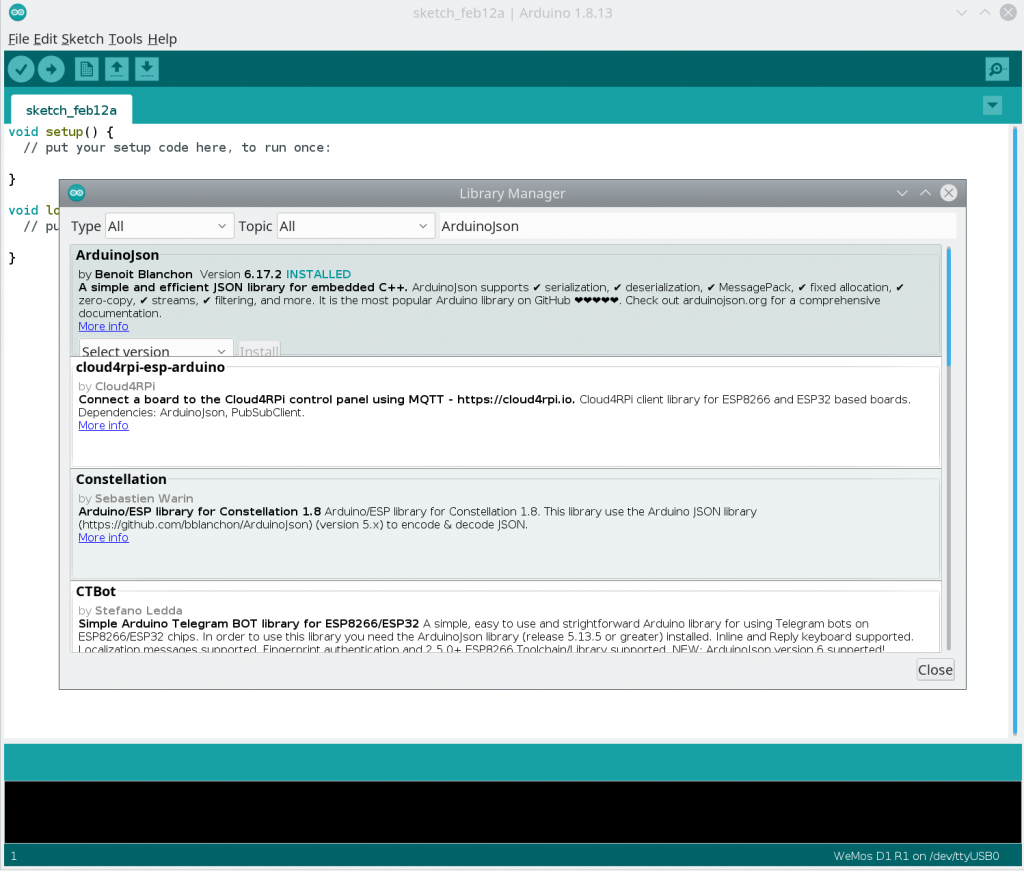
Now we have to install the required libraries. First two are “ArduinoJson” and “StreamUtils” which we use to decode the SignalK JSON messages. To install the libraries, click on “Tools->Library Manager”, search for “ArduinoJson” in the dialog popping up, select the required version and click on “Install” (see screenshot below). We install “StreamUtils” the same way.
For the 0.66″ OLED display we need the libraries “Adafruit BusIO”, “Adafruit GFX Library” and the special version “Adafruit SSD1306 Wemos Mini OLED”. Please do not install the “Adafruit SSD 1306” Library! The installation of the libraries required can be done the same way like described above.
Short overview of the sketch
You’ll get the sketch for the ESP8266 from Github. Best is to use the tag v0.0.2 which also is described in this documentation. You can download an archive or directly check out using the git command:
git clone -b v0.2.0 https://github.com/Vehicle-Hacks/Arduino-SignalK.gitThe sketch is located in “Arduino-SignalK/Arduino-ESP8266-SignalK/Arduino-ESP8266-SignalK.ino”. In the beginning required libraries and global variables are set up. Below are the configuration options:
#define DATA_FROM_FILE
//#define DATA_FROM_ARDUINO

// For SignalK data
IPAddress signalkServer(192, 168, 4, 1);
const unsigned int signalkPort = 8375;      // SignalK Port which is the same for TCP and UDP
The first two lines toggle between two subscriptions: using “#define DATA_FROM_FILE” we subscribe to the paths used in the netcat tests above from the NMEA file. Using “#define DATA_FROM_ARDUINO” two of the signals from the Arduino UNO set up in the last step are subscribed. The following two lines contain the IP-Address of the Raspberry PI – this time for the WiFi Interface as choosen during set up – and the port we’re using for the TCP connection.
In the setup() function first the display is initialized so that we can display status or error messages during connection. Next we connect the ESP8266 to the WiFi of the Raspberry PI. If connection was successfull, we connect to the SignalK server. After we successfully received a “SignalK Hello Message”, we print the name of the server on the display and send the connection string. Then the initialization is finished.
In the loop() function we check if the TCP client received data from the SignalK server. If this is the case, we decode it using ArduinoJson and read out the values of “environment.depth.belowTransducer” and “navigation.speedThroughWater”. These values will be printed on the display finally.
Testing the sketch
First we’ll use the signals from the NMEA file which we already used in the beginning. To test the sketch, first we start the SignalK server in the configuration playing back the NMEA file:
pi@raspberrypi:~/signalk-server-node $ ./bin/nmea-from-fileThen we compile the sketch and upload it to the ESP8266. This time, the configuration of the #defines has to be:
#define DATA_FROM_FILE
//#define DATA_FROM_ARDUINO
After the sketch is uploaded, the ESP8266 will connect to the WiFi of the Raspberry Pi and display it’s own IP address and the one of the gateway (the Raspberry Pi). Next it’ll quickly display the name of the SignalK server and finally the values for sonar depth and the velocity from the NMEA replay.
If this first step was successfull, we can start with live data from the Arduino Uno. Therefore, we stop the SignalK server on the Raspberry Pi using ctrl+c and start the configuration using the UDP connection to the Arduino Uno. These configuration should be stored and will be added once we start the SignalK server using the default configuration:
pi@raspberrypi:~/signalk-server-node $ ./bin/signalk-serverNow we can start the Arduino Uno and should be able to see the connection “Arduino UDP” active in the SignalK Dashboard. If that’s the case, we can change the configuration to the Arduino subscription in the ESP8266 sketch:
//#define DATA_FROM_FILE
#define DATA_FROM_ARDUINO
Finally we can compile and upload the sketch. The ESP8266 connects using the same sequence as in the first test, but then displays the values for tank level and temperature. You can again play with the sensors on the Arduino Uno and watch the values on the ESP8266 display change.
Result and next steps
After this step we managed to send data from the Arduino Uno to the SignalK server on the Raspberry Pi, subscribe to the data using an ESP8266 and show it on a display. So, the first prototyp of a complete system is existing. Of course, the display is tiny and the senors are more exemplary then really usefull. But these are topics we can address step by step now.