Why choosing SignalK at all?
In a mobile home or a caravan – even more on a big yacht – there is a lot of properties you have to supervise: The level of fresh and waste water tanks, the state of charge of the batteries and the power of the solar panels, air conditioning and heating and finally navigation or engine data like position, water depth or engine temperature. Then you want to switch electrical consumers like light, pumps, battery chargers or navigation or entertainment electronics. In classical systems you have individual sensors and switches which are wired with specific displays or consumers therefore – which leads to a quite inflexible connection of devices.
Thats why now there are alternatives like NMEA2000, Mastervolt Masterbus, Raymarines SeaTalk NG or the CI Bus for caravaning which typically are based on a CAN bus. The Advantage of a these bus systems is that they can share sensor signals with a lot of subscribers and you can also realize smart switching. For those, there is no hard wired connection between switch and consumer. Instead the switch state is read in a software, which defines the consumer or consumers which have to be switched and then does the actual switching by a smart switch. The downside of the mentioned systems is that they or non-public or even proprietary. Additionally, the CAN bus is suitable for small embedded systems but you have to code/decode a lot of data into “bit fields” which is error prone and labor intensive.
Searching for alternatives we found SignalK, which is an open standard and is based on a lot of technologies which are quite modern and established for the WWW like TCP/IP, JSON, http and others. Additionally to being an open standard, the chosen technologies have the advantage that they are established in IT and electronics, there are a lot of SW packages for working out of the box and the chosen formats are easily interpretable by humans e.g. for debugging. The disadvantage is that they are much more resource consuming than e.g. a CAN bus, which could be an argument against using them on a micro controller. Figuring out if they are anyway usable and develop possible solutions is the goal of this project.
Development System
The first experiments we’ll do using a bench setup using existing components like e.g. a Raspberry PI, Arduino Board, ESP8266/ESP32 and according shields which are established in the maker community. We’ll use these components to develop and test the software. The bench setup should be similar to a configuration we would expect in a bigger caravan or yacht. An overview of the target system is shown in the picture. We’ll walk through the parts now.
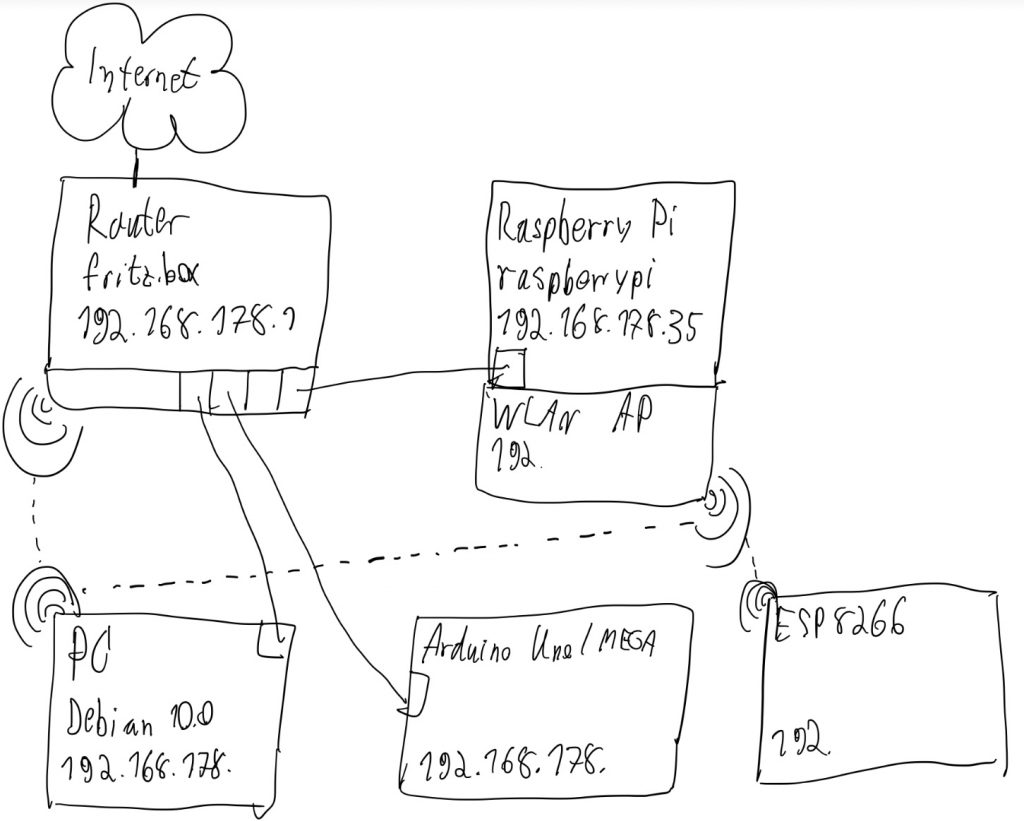
A SignalK setup can contain a central server. Additionally to the consolidation of the data model it can serve further purposes. For the SignalK server, here we chose the node.js based server from the SignalK project which will be running on the Raspberry Pi. Further tasks the Raspberry PI can take over are e.g. a NTP server (time server) or WiFi access point. For those tasks, compared to micro controllers a rather powerful system with a “full” operating system is required, why we chose the Raspberry Pi using Raspberry PI OS (a debian based Linux distribution). In the first step we’ll setup the Raspberry Pi.
To connect several devices by ethernet we need a switch. In my case this is taken over by a “Fritz!box”, which also serves as a router. Additionally, it is a DHCP server (assigning IP-Addresses to the devices), as NTP-Server, provides access to the internet and provides a WiFi access point. In the future, we can replace more and more services of the Fritz!Box by the Raspberry PI and finally replace it by a switch (without internet access) what might be closer to a typical installation.
Because a WiFi connection is easily disturbed (e.g. because of low signal quality or high occupancy of the selected channel) resulting in a low data rate or connection failures, for inputs requiring high availability (e.g. navigation or engine data) we prefer a wired ethernet connection. In the lab we use an Arduino Uno/Mega with an ethernet shield. An Arduino Uno/Mega is providing many analog inputs and outputs and interfaces like SPI and I2C which allows us to connect many sensor and actuators. The disadvantage of the AVR based Arduinos is the low computational performance and the tiny FLASH/SRAM. To figure out if we can still use it, we’ll build up a quick prototype.
An ESP8266 or ESP32 has Wifi and a lot more computational performance, FLASH and SRAM. This also allows the usage of graphical displays and also is an advantage when receiving and evaluating SignalK messages. The bottom side is that it only has few analog I/O’s. So we’ll first use it for receiving SignalK messages and showing them on a display. Although usually used with Wifi, the ESP32 also ships with an Ethernet MAC, so on a a few board there is also an Ethernet Port on the ESP32.
Last thing we need is a developer machine. Here we use a PC with debian Linux, but a Windows machine or a Mac should also be fine. It is connected with the router by Ethernet or by Wifi. The Wifi can also be connected with the Raspberry PI’s access point for testing purposes.