The Raspberry Pi will act as the central server in the SignalK network. In this step we describe how it will be configured and tested. We’ll install the SignalK server from source and later add a Wifi access point on the Raspberry Pi so that we have a private Wifi which is not connected to the internet in which we can add our Wifi clients.
Hardware and Software in use
- PC with Debian 10.0
- Raspberry PI 3 Model B V 1.2
- Raspbian Buster Lite (02.12.2020)
Create a SD card using Linux
You can download Raspi OS from the official page. Here we’re using the Raspi OS Lite Image release on Dec. 2nd 2020 but other Images from the “Buster” release should also work. After downloading, uncompress the archive:
ralph@debian:~/Downloads$ unzip 2020-12-02-raspios-buster-armhf-lite.zip
Archive:  2020-12-02-raspios-buster-armhf-lite.zip
  inflating: 2020-12-02-raspios-buster-armhf-lite.img
Before writing the image to the SD card, you have to figure out which device is used for the SD card. You can do this by using the command “sudo” directly after inserting the SD card. The command will generate a lot of output, by using a pipe “|” to the command “tail” you’ll only see the last few lines:
ralph@debian:~/Downloads$ sudo dmesg | tail
...
[ 2331.527848] mmc0: new SDHC card at address 1234
[ 2331.528287] mmcblk0: mmc0:1234 SA32G 28.9 GiB
[ 2331.530239]  mmcblk0: p1 p2
Here the last two lines are relevant which show that a SD card with two partitions (mmcblko: p1 p2) is recognized as block device /dev/mmcblk0. The number of partitions depends on the former use of the SD card and is not relevant for us. We just write the image to the SD card using the command “dd”:
ralph@debian:~/Downloads$ sudo dd if=2020-12-02-raspios-buster-armhf-lite.img of=/dev/mmcblk0
3629056+0 Datensätze ein
3629056+0 Datensätze aus
1858076672 bytes (1,9 GB, 1,7 GiB) copied, 597,741 s, 3,1 MB/s
After writing the image you have to activate SSH. If you use the raspi “headless” (without a display and a keyboard connected, which is popular for using it as a server) you have to do this before the first boot. To activate SSH, you have to create an empty file named “SSH” on the boot partition. The boot partiton is the first partition (the dmesg output in the example above was from an old raspbian image). This partition has to be mounted to a directory vefore you can access it. After that, the empty file can be created by using “echo” and the output redirection “>”:
ralph@debian:~$ mkdir tmp
ralph@debian:~$ sudo mount /dev/mmcblk0p1 ./tmp/
ralph@debian:~$ sudo sh -c 'echo "" > ./tmp/SSH'
ralph@debian:~$ sudo umount ./tmp
Basic Installation on the Raspberry PI
After booting the Raspberry Pi, we can start installing the first packages. By default it will register as “raspberrypi” at your router. First we log in (the default password is “raspberrypi”), set a new password and update the system:
ralph@debian:~$ ssh pi@raspberrypi
The authenticity of host 'raspberrypi (2001:16b8:307b:9700:b14e:6b35:1841:5839)' can't be established.
ECDSA key fingerprint is SHA256:e8XuEC/4QOPTWy1n/16etgRGFVJbkvPss8Wrq4z6Z1A.
Are you sure you want to continue connecting (yes/no)? yes
...
pi@raspberrypi:~ $ passwd
Changing password for pi.
Current password:
New password:
Retype new password:
passwd: password updated successfully
pi@raspberrypi:~ $ sudo apt-get update
Get:1 http://archive.raspberrypi.org/debian buster InRelease [32.6 kB]
...
pi@raspberrypi:~ $ sudo apt-get upgrade
Reading package lists... Done
...
Do you want to continue? [Y/n] y
...
pi@raspberrypi:~ $ sudo apt-get dist-upgrade
Reading package lists... Done
...
pi@raspberrypi:~ $ sudo reboot
Connection to raspberrypi closed by remote host.
Connection to raspberrypi closed.
When doing the reboot the SSH connection will be closed, you have to log in again. After that, we install the dependencies of the SignalK server. For node.js there is a little detour: You install the current version of node.js using npm, which is based on node.js…So first you have to install the old version contained in the distribution, which we’ll then use to update to the current version. Both versions end up in different paths, so there will be no conflicts. We just have to ensure that after installation the bash also uses the new version. So, connect to the raspberry pi again and install the packages contained in the distribution:
ralph@debian:~$ ssh pi@raspberrypi
pi@raspberrypi's password:
...
pi@raspberrypi:~ $ sudo apt-get install git ntp netcat nodejs npm libavahi-compat-libdnssd-dev ntpstat
Reading package lists... Done
...
After this operation, 91.7 MB of additional disk space will be used.
Do you want to continue? [Y/n] y
...
The next step is to install the new npm version and then force the bash to cache the new path using “hash” so that the new version of npm will be used. This command can fail if bash didn’t store a path for npm already. Using “npm -v” you can check if the newest version of npm is registered for the pi user and root:
pi@raspberrypi:~ $ sudo npm install npm -g
...
pi@raspberrypi:~ $ hash -d npm
pi@raspberrypi:~ $ sudo npm -v
6.14.10
pi@raspberrypi:~ $ npm -v
6.14.10
Next we can install “n” and use this to install the current (stable) version of node.js. Again, for “node” the bash has to store the new path:
pi@raspberrypi:~ $ sudo npm install -g n
/usr/local/bin/n -> /usr/local/lib/node_modules/n/bin/n
+ n@7.0.0
added 1 package from 4 contributors in 1.484s
pi@raspberrypi:~ $ sudo n stable
  installing : node-v14.15.3
...
pi@raspberrypi:~ $ hash -d node
pi@raspberrypi:~ $ node -v
v14.15.3
Installation and Test of the SignalK Server
After getting the current node.js, we can install the SignalK server. We install it directly from the official github to get the latest version. Therefore, we clone the repository, update and install the dependencies and then do a “build”:
pi@raspberrypi:~ $ git clone https://github.com/SignalK/signalk-server-node.git
Cloning into 'signalk-server-node'...
...
pi@raspberrypi:~ $ cd signalk-server-node/
pi@raspberrypi:~/signalk-server-node $ npm update
...
pi@raspberrypi:~/signalk-server-node $ npm install
...
pi@raspberrypi:~/signalk-server-node $ npm run build
Now the SignalK server is “build” and we can start it for the first test playing back data from a file:
pi@raspberrypi:~/signalk-server-node $ ./bin/nmea-from-fileIf you now open a webbrowser and go to the address “http://raspberrypi:3000”, the “SignalK Dashboard” should who up:

If you open “@signalk/instrumentpanel” from “Webapps”, you should see the following visualization of SignalK data:
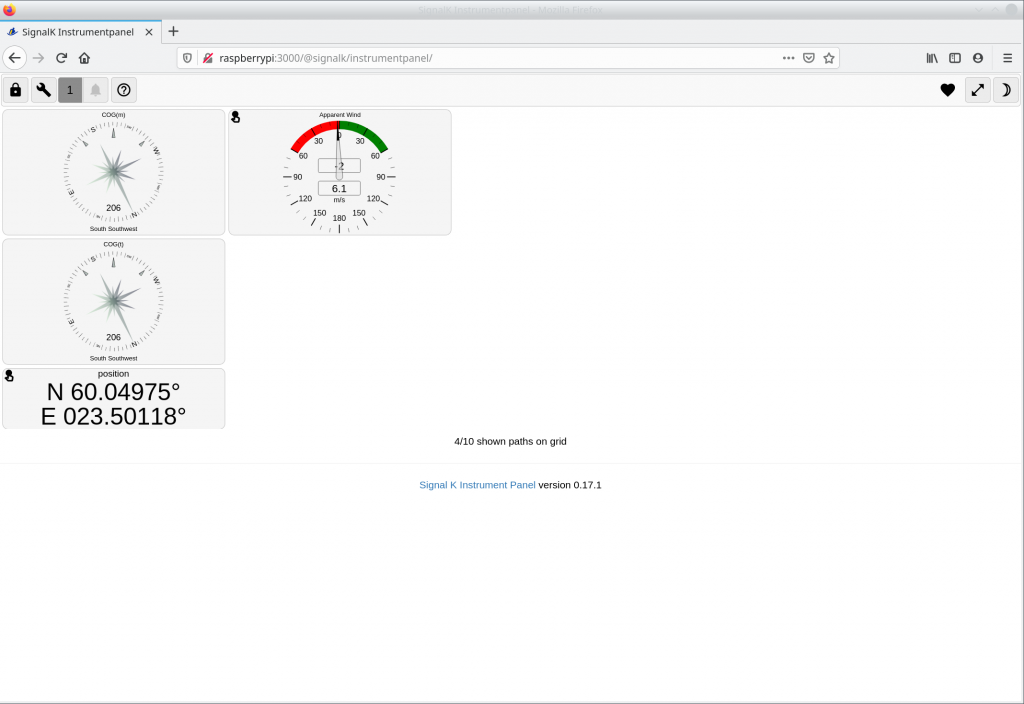
If everything is working so far, you’re prepared for the next step. Then, we’ll read in sensor connected to an Arduino, send the data to the SignalK server and visualize it in the instrumentpanel.
Results and next steps
Now, we have an up to date SignalK server on a Raspberry PI and ensured that it’s working. What’s missing is some real input values. These we will create using an Arduino Uno in the next step. During the further development, we’ll have to add the configuration of further services on this page. We’ll add these step by step and keep you updated.